A stereo rig from Sony RX100 III cameras and generic Arca Swiss compatible parts
- kbqvist
- May 30, 2021
- 13 min read
Updated: Jun 1, 2021
Karsten Bruun Qvist
1 Introduction
Recently I wrote a couple of articles on how one can use the ability of many recent smartphones to make photos that contain depth maps (depth photos) as a stepping stone towards stereo photographs, rather than using the traditional approach that starts out with two photos captured from slightly different viewpoints. This ‘novel’ method is very convenient as it requires no more effort than taking any other single photograph. The method often works well, and is particularly suited for close-up photos. Artifacts do occur, some of which can be remedied in post production.
In the previous articles (here, and here) I argued that the depth photo approach has its place in the arsenal of stereo photography methods, especially if convenience is a consideration.
If image quality and flexibility during recording are the main concerns, and you do not mind inconvenience, it is worth considering an approach where you mount two identical cameras on a rig, with adjustable distance between them. The purpose of this article is to describe one such solution, that does not require any custom made pieces, based on two Sony RX100 III cameras, and generic Arca Swiss compatible parts.
2 Why Sony RX100 III?
The original motivation for starting this project was based on an interest in making stereo portraits in controlled light situations. I started out using a Fuji Real 3D W1 stereo camera, with two lenses and sensors, but experienced several issues with that. Firstly, the camera is from 2009, and the image file quality is less than impressive, seen from a 2021 perspective. Secondly, the stereo base is 77 mm, which is more than ideal for the subject to camera distance in my portrait use case, resulting in a somewhat exaggerated depth. Finally, the camera has no provision for remote triggering, nor face or eye detect autofocus, all of which are desirable for self portrait use.

These issues helped define that I was looking for a pair of cameras with much better image file quality, face and eye autofocus, small enough to allow a smaller stereo base, and ability to be remotely triggered. Realizing that the cameras would likely have non-interchangeable lenses, the desired zoom range became a consideration. These cameras tend to use an electrical motor to control zoom, which makes it cumbersome to adjust two cameras to exactly the same focal length, except for the ends of the range. I therefore reasoned that the low and high end of the focal range were probably going to be the ones that would get used in practice. This in turn meant that a relatively narrow zoom range, e.g. 3x likely would be more helpful than a very wide one, e.g. 10x, or more.

The Sony RX100 III happens to be a rather good match to these criteria. The image quality is widely considered to be excellent for a camera of its size (20 MP, 1 inch sensor), and it has a zoom range corresponding to the field of view of a 24-70 mm zoom on a full frame camera. Remote triggering is possible, as is face and eye auto focus.
A zoom range ending at around 85 mm would have been nice, but the sensor resolution is high enough to allow for some cropping to compensate for that. Without a flash hot shoe there is unfortunately no way to attach a remote flash controller to the camera, which would have been very useful for flash portrait photography. However, the built in pop-up flash can be used to trigger one or more off camera flashes, provided these are operated as optical slaves. Final factors leading to choosing the Sony RX100 III was that I already owned one, and that this model is quite affordable on the used marked.
You will want to set up the two cameras the exact same way
While known for good image quality, the RX100 III is not known for stellar ergonomics. This is partly a consequence of its petite size, which makes handling a bit awkward, but also of a menu system with a somewhat obscure structure.
3 Setting up the cameras
Although probably obvious, it may still be worth mentioning that you will want to set up the two cameras the exact the same way. This includes running the same firmware version, in my case ver. 2.00.
You will also want to make sure that settings throughout the menu system are identical, and that the clock in both cameras have the same time. It is also helpful to set up the Fn menus the same way, so you can change the most frequently modified options quickly. How you want to set the camera up will depend on your use case and preferences, but to give an example, below is a screenshot of my current Fn menu setup, where the choices are mainly based on use for controlled light portraits.

Personally I prefer to set white balance, aperture and exposure time manually. For portraits I often use face, or eye autofocus and half-press the release button to allow pre-focus to happen, before making the exposure, assuming that this helps to synchronize the cameras by eliminating any effect of variation in time needed for autofocus, between the two cameras.
4 Flexible configuration with generic Arca Swiss compatible parts
Not having access to neither a metal, nor an electronics workshop, I decided to go for standard parts that are easily obtainable, both for the physical mounting and the electrical wiring. In the end it turned out to provide a good amount of flexibility. Also, most of the parts are inexpensive, and you may find that you can use them for other purposes as well.

The photo above shows the parts used, including two Sony RX100 III cameras and a Sirui 3T-15 tabletop tripod. From front to back the parts are (with indicative ebay prices in parentheses) :
Arca Swiss compatible quick release plate 20 cm (€ 8), or longer
Arca Swiss compatible quick release clamp adapter, x2 (€16 for two)
Universal Arca Swiss compatible L-plate, x2 (€11 for two)
A tabletop tripod, such as the Sirui 3T-15 (about €80) shown in the photo can provide a useful ‘grip’ to the rig when used hand held, with the 20 cm plate slid into the clamp on the ball head. It is not essential for functionality, and a cheaper alternative can certainly be found; I just happened to have one lying around.
Depending on the configuration you can obtain minimum stereo bases between 5.5 and 11.6 cm
Physical mounting
With this collection of parts it is possible to assemble the rig in several configurations. Perhaps the most straightforward way is the one shown below, where the minimum stereo base is 11.6 cm, while the maximum depends on the length of the (bottom) plate. Note that the short part of the ‘L’ has been removed from one of the L-plates to shave off a few mm of the minimum stereo base.

If we ‘stagger’ the two cameras, as shown below, we can reduce the minimum stereo base to 6.5 cm. Now, the maximum stereo base depends on the length of the (L-) plates the camera directly rests on, not on the length of the bottom plate. Also note that these plates can be ordinary Arca Swiss compatible quick release plates if you only ever use the cameras in landscape orientation.

Initially I was somewhat skeptical about how staggering of the cameras would affect the quality of stereo photos. So far I found it to work very well, as it turns out that Masuji Suto’s Stereophoto Maker software is able to make the necessary adjustments to image size. This may come as less of a surprise if you do the math and calculate the magnitude of the adjustment needed. Already at a subject distance of slightly over 2 m, a size adjustment of -1% to one photo, and +1% to the other is enough to make the necessary correction, and at longer distances, the corrections becomes progressively smaller. All of that being said, I only use a staggered configuration when a straight will not give me the stereo base I need.
Making use of the short part of the L-brackets to mount the cameras in a ‘straight’ portrait fashion in the rig, we obtain a minimum stereo base of 7.9 cm.

When staggering the cameras in portrait orientation we obtain a minimum stereo base of 5.5 cm.

It might be interesting to compare the minimum stereo bases above with what would be possible in a straight configuration, if a mounting system were custom made. As the photo below illustrates, the closest we can possibly get the two lenses is in an upside-down, bottom to bottom configuration where the distance is 5.6 cm. If both cameras have the same up-down orientation, the minimum distance becomes 5.8 cm.

Carrying the rig
When used hand held, adding a tabletop tripod to the basic rig can provide a much improved 'grip'. Even so, carrying the setup around becomes inconvenient fairly quickly, and it is hard to find a comfortable camera strap solution. So far, what has worked best for me for outdoor use is a small camera bag where the rig is docked between making photographs.

5 Electrical wiring and basic synchronization
Connections
The Sony RX100 III can be remotely triggered through its USB/multiport. Some of the photographs in the previous section show short cables attached to the multiports of the two cameras, ending in micro-jack (2.5 mm) plugs. It is important to note that although this cable looks like it has a micro USB B plug in one end, and a micro jack (2.5 mm) in the other, it needs to be a special cable called a 'S2 remote cable for Sony multiport'. The Sony multiport connector has a 15 pin plug, as opposed to the 5 pins of a standard micro USB B plug.
The basic synchronization is accurate to at least one millisecond
The simplest way to trigger both cameras at the same time is to connect the two multiports with two S2 cables; pressing the trigger of any one of the cameras will then trigger both cameras. Below this has been achieved, rather inelegantly perhaps through two 2.5 mm to 3.5 mm jack adapters, and one 3.5 mm female-female jack adapter. While this has worked adequately, replacing the adapters with a small soldering job would likely improve long term stability. Alternatively, successful synchronization of some Sony cameras, using the Sony VMC-MM2 cable has been reported. This cable was created to allow triggering a Sony RX0 as a 'sub-camera' when used with a larger Sony camera.

S2 remote cable for Sony multiport (€ 8 for two)
Jack adapter, 3.5 mm male to 2.5 mm female (€ 5 for two)
Mini jack (2.5 mm) female-female adapter (€ 3)
For portrait and self-portrait work in a studio like situation, one may prefer a solution that allows wireless triggering. Yongnuo RF605s are transceivers can be configured as either transmitter or receiver. They are sold in in pairs, that cost about €40. Using one as a remote transmitter, and attaching one in receiver mode to each camera, via S2 remote cables was found to work well.

Later experiments showed that a separate receiver for each camera isn’t necessary; one common receiver is enough when connected through a 3.5 mm jack Y-splitter cable to the two S2 cables going into the multiports of the cameras. This arrangement can be achieved with one male 2.5 mm to 3.5 mm female, and two 3.5 mm male to 2.5 mm female jack adapters, as shown below. Again, a soldering job, to eliminate the connecters would likely improve long term stability.

Synchronization
The quality of synchronization was examined with the simple setup shown below. An Android tablet was running the ‘Stopwatch & Lap Timer, Advanced Sports Chronograph’ from Chronus Stopwatches, set to a precision of 1/1000 sec. Both cameras were manually prefocused on the tablet screen, and set to an exposure time of 1/2000 sec. More than 50 image pairs were recorded and compared for each synchronization method.

Disregarding image pairs were time could not be read with certainty in one or both images due to blur, both images always showed the exact same time, down to the millisecond, no matter which of the three synchronizations methods described above was used. This implies that the basic synchronization was accurate to at least 1 millisecond, which is quite good.
Although it is hard to find specific data, several Sony cameras with the multiport seem to have a reputation for synching well, e.g. the A5100 and RX0.
6 Brief outline of photo handling and processing
When you finish a photo shoot, you will have all the ‘left’ photos on one memory card, and all the ‘right’ photos on another card. If you did not reset photo numbering on both cameras before the shoot, matching photos will likely have different numbers. If you forgot to secure that both cameras have the same time before starting, your matching files may also have different time stamps. Rarely, but occasionally one camera fires, while the other does not, meaning it is not a certainty that file no x in the sequence from one card is a match to file no x on the other. How do you deal with a mess like this?
..you may be thinking that this all sounds seriously inconvenient, compared to taking one photo with a smartphone that can record depth maps
StereoPruner
Fortunately there is a fairly convenient solution, a small piece of software called StereoPruner created by Ken Burgess. You will find a download link here.
When presented with separate folders for left and right photos, the software finds all matching pairs, renames one set so the filenames of left and right photos match, and add a _l, or _r suffix to each file. All of this happens in the blink of an eye. If you next step is to work in StereoPhoto Maker, it will be helpful to copy all matched left and right photos to one common file folder.
StereoPhoto Maker
In StereoPhoto Maker you will use the command ‘File/Open Left/Right Images’ (Keyboard shortcut ‘O’), which will prompt you to open first the left, and then the right photo. Due to the renaming done by StereoPruner, StereoPhoto Maker will automatically suggest the correct right photo, based on the left photo you have chosen, provided they are in the same folder (except for the very rare occasion where StereoPruner has made a mistake).
With both a left and a right photo opened, a good first step is to do an auto alignment of the two images, using the ‘Adjust/Auto alignment’ command (Alt+A). This step will perform a geometrical transformation of the two photos to counteract a number of potential imperfections, including an adjustment of size if the images were recorded using a staggered camera configuration. For the auto alignment to work its best, check ‘Better precision’ and uncheck ‘Only horizontal and vertical alignment’ in ‘Edit/Preferences/Adjustment’ before use.
Auto alignment also sets a preliminary stereo window, but it is a good idea that you fine tune that manually, e.g. using the keyboard arrows in anaglyph display mode.
With two cameras involved, and particularly if they were not operated fully in manual mode, it is likely that there will be slight variations in color and tone between the left and right images. StereoPhoto Maker has several tools to work with this. Among them are the command ‘Adjust/Auto Color Adjustment’ that takes care of color inconsistencies, and the levels adjustment (Shift+L) that can be used to adjust tone of one, or both photos.
After these steps, if no further adjustments are needed, it may be time to crop the image, and save in the chosen output format.
7 Reflections - is it worth it?
If you have read the previous articles alluded to in the introduction, you may be thinking that this all sounds seriously inconvenient, compared to making one exposure with a smartphone that can make depth photos (i.e. include depth maps in photos), and then convert to a stereo photo in StereoPhoto Maker. And you would be absolutely correct. Somewhere lingers the question: Is it worth it?
.. a stereo rig is a major step up in inconvenience..
This question, of course has no Universal answer, it depends on your personal perspective, and that may very well vary with circumstances. If the depth photo method fulfills your needs, e.g. for social media use, that is very difficult to beat in terms of convenience, and it doesn't matter whether the subject is static, or moving.
If you do not consider the depth photo method to be real stereo photography, you may prefer to use a smartphone app, such as 3DSteroid Pro for Android, or i3DSteroid for iPhone that helps you make two successive captures, performs alignment, and saves in the preferred stereo format. That can work well as long as nothing moves in the scene; but as as soon something does, problems creep in.
As a point and shoot alternative that takes two photos simultaneously, the Fuji Real 3D has no problems with movement in the scene. Camera settings, such as zoom level, white balance, ISO, shutter speed and aperture are automatically coordinated for the two exposures, and the two pictures conveniently wrapped into a single file. Compared to using a smartphone it is an extra piece of equipment, but the Fuji Real 3D still fits in many pockets, and is, at 310 g not that heavy. Unfortunately, the technical quality of the files is somewhat disappointing, seen from a 2021 perspective.
Going from any of the previous options to a stereo rig, such as the one described here is a major step up in inconvenience. You will be carrying around a very oddly shaped contraption weighing between 1.0 (without tabletop tripod) and 1.4 kg (with), and probably also a bag. The ergonomics of the Sony RX100 III is not stellar to begin with, and when combining two of them into a rig, it becomes significantly worse. Careful attention to alignment is needed when assembling the rig. Keeping all camera settings in sync is your own responsibility. At the end of the shoot, there are two memory cards to transfer files from, and matching image pairs needs to be identified, before you can start working with them.
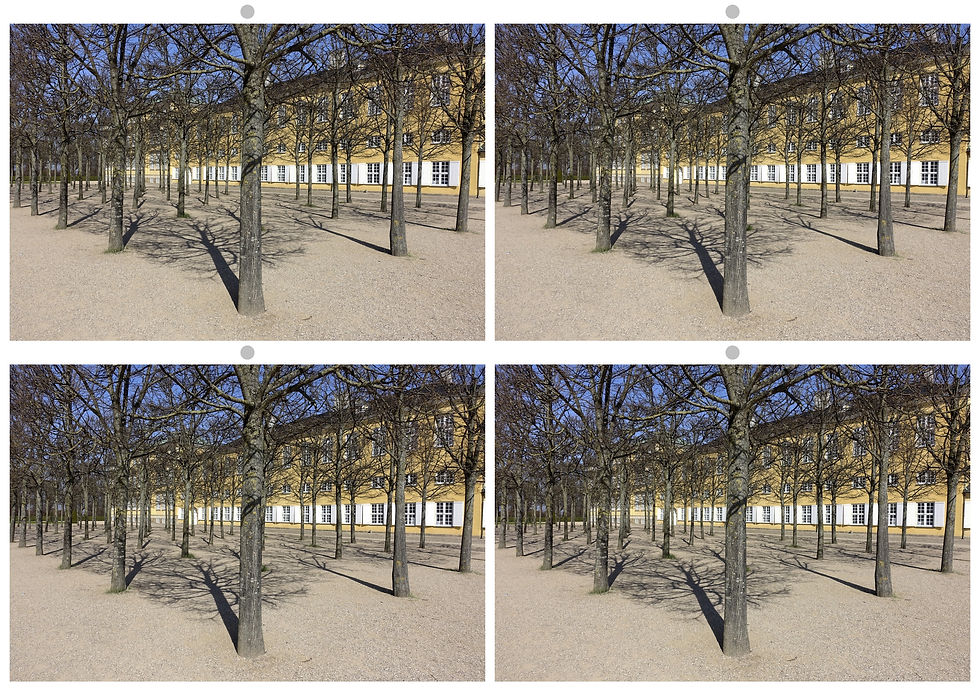
If a stereo rig is so much more inconvenient, why would anyone bother to use one? The short answer is that the technical image quality potentially can be better. In the example below, recorded with the Sony rig in staggered landscape configuration there is a lot of detail in the twigs and shadows that the one exposure, depth photo method would have problems with. If a smartphone app had been used to take two sequential photos, movement in twigs and shadows would likely have caused disturbing artefacts, as it was a windy day. Also, the resolution and sharpness of the Sony RX100 III cameras are better than those of the smartphone and Fuji Real 3D W1 options.
The anaglyph version shown first requires red-cyan glasses for seeing the stereo effect. As always with anaglyphs, they may work well on some displays, such as the one they were created on, and poorly on others.

If the anaglyph does not work well for you, try one of the 'free view' versions below (for instructions see here).
For me the different options do not exclude each other. I use my smartphone for casual shots, in some cases with the depth photo, one exposure method, in others with the sequential, two exposure method. While the Fuji Real 3D does not get much use any more, the Sony RX100 III rig is mainly used for more deliberate work. One example of that is controlled (flash) light portrait photography, which will be discussed in an upcoming article.
Although there may be no singular answer to whether it is worth is, hopefully you now have some background for considering whether a stereo rig is something you would like to try, and a few ideas on how it can be done without access to mechanical and electronic workshops.
Below you may find links to other websites that also discuss stereo rigs.
8 Useful references and links
Craig Hood - 3D stereo Rig: http://craighood.com/3DSTEREORIG.html
George Themelis' website (illustrations of stereo rigs and more): http://www.drt3d.com/
Karsten Bruun Qvist - A promising novel approach to stereo photography. https://kbqvist.wixsite.com/photoq/post/a-novel-way-to-make-stereo-photos
Karsten Bruun Qvist - Huawei P30 Pro smartphone vs the Fuji Real 3D as a stereo camera. https://kbqvist.wixsite.com/photoq/post/huawei-p30-pro-smartphone-vs-the-fuji-real-3d-as-a-stereo-camera
Karsten Bruun Qvist - Controlled light 3D portraits from a stereo rig based on Sony RX100 III cameras https://kbqvist.wixsite.com/photoq/post/controlled-light-3d-portraits-from-a-stereo-rig-based-on-sony-rx100-iii-cameras
Masuji Suto - StereoPhoto Maker: http://stereo.jpn.org/eng/stphmkr/
Masuji Suto - 3DSteroid Pro – Android app for making sequential left-right type stereo images: https://play.google.com/store/apps/details?id=jp.suto.stereoroidpro&hl=en&gl=US
Rebecca Sharpe (tutorial for 3DSteroid Pro) - How to Make Your Own Android Smartphone Stereoviews: Basic Tutorial:
Masuji Suto - i3Dsteroid – iPhone app for making sequential left-right type stereo images: https://apps.apple.com/us/app/i3dsteroid/id467945370
Rebecca Sharpe (tutorial for i3DSteroid) - How to Make Your Own iPhone Stereoviews: Basic Tutorial:
Matt Gavin - S1 and S2 Modes on a Flash: What’s the difference? https://improvephotography.com/46250/s1-s2-modes-flash-whats-difference/
Newport T.S. (several stereo rigs described):
Rebecca Sharpe - How to View Stereoscopic 3-D Images https://stereoscopy.blog/2019/08/04/how-to-view-stereoscopic-3-d-images-basic-tutorial/


i am alos share cameras review on my website: https://www.camerasdrop.site/