A promising novel approach to stereo photography
- kbqvist
- Mar 3, 2021
- 8 min read
Updated: May 30, 2021
Karsten Bruun Qvist
If you are interested in stereo photography you likely already know that the classic principle, as old as photography, is to record two photographs, one corresponding to what each eye would see, and then during viewing of the images, arrange for each eye to see only the image that is intended for that eye.

Now, there is a lot of ways one can go about obtaining separate images for each eye, and also many ways to ensure that only one eye gets to see each image. Here, we will concern ourselves mainly with the recording side of things, with the aim of working our way towards a novel method that hasn't received much attention among stereo photographers so far, although it is, in my view quite promising. To provide some perspective we will start with a couple of the better known methods, from a smartphone user perspective. At the end, links are given to some resources you may find helpful.
With the novel method it is just as simple to capture a stereo image as any other picture... simpler than with the sequential method where you must take two photos, or the mirror method where you mount a physical attachment
Capture the left and right images sequentially with any ordinary camera
In terms of equipment needed, the simplest approach is to use any camera to capture the left and right image sequentially: simply capture one image, then slide the camera a few cm to the right, and take the second image.
The main advantage of the sequential capture method is that you do not need any special equipment for recording – any camera, including your smartphone will do. Another advantage is that you can freely adjust the lateral distance between the two shots to fit the subject distance, or scene. For a close-up you may want to use a smaller distance, for a distant subject, probably a larger.
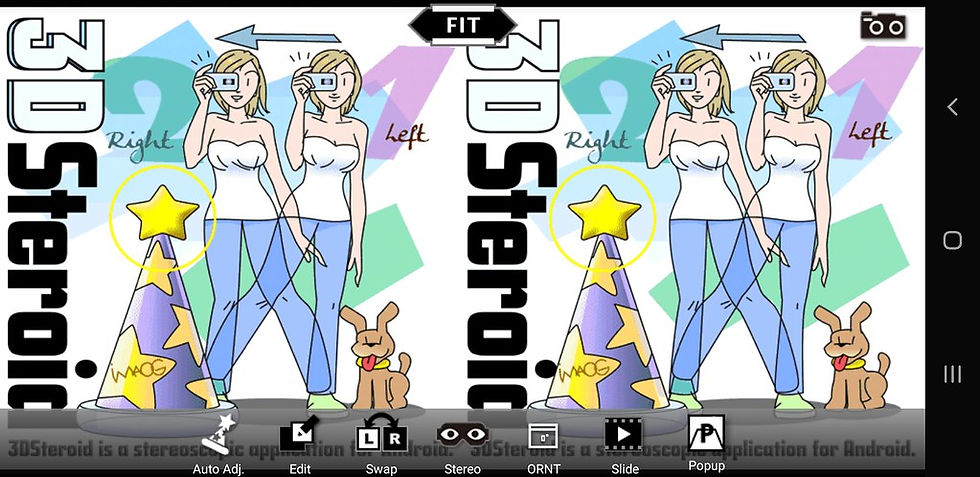
With digital images, you need software to align the left and right image and convert into the desired format for viewing. If you are using a ‘real’ digital camera, Masuji Suto’s free software Stereophoto Maker is a very good choice. If you are using a smartphone, it is convenient to use an app that assists with the whole workflow, including taking the photos, managing files, aligning them, and saving in the stereo output format of choice right on the mobile device. 3DSteroid Pro (Android) and i3DSteroid (iPhone) are excellent, and they both have detailed tutorials at https://stereoscopy.blog/.
The main limitation of the sequential method is that it does not work well for things that move between the two exposures. This includes not only what you would think of as subjects - potentially anything in the frame that moves, such as flowing water, leaves and branches, random pedestrians, etc. can result in unpleasant effects.
Capture left and right ‘half’ images with an ordinary camera + mirrors
One way to avoid the problem with movement is to effectively make an ordinary camera take the left and right images simultaneously by using mirrors in front of the lens to ensure that half of the sensor sees the scene from a left eye perspective, and the other half, from a right eye perspective. In this way both views are captured at the same time, in one frame. As side effects, the effective sensor resolution is cut in half, and some degradation of image quality may potentially happen due to the mirror system. Landscape orientation images are usually not possible, but video recording is, if the camera supports that.

The company Loreo (loreo.com) has provided solutions for traditional cameras for decades, and more recently there are several providers of attachments for smartphones, among them kula3d.com. Interestingly, it is possible to achieve much of the same result with one mirror only, but it involves a few more post processing steps. Gordon Au's description of this minimalistic variant, in both written and video form can be found here.
Some editing task are much easier, such as cloning, dodging and burning when you only need to modify one photo, rather than two
Capture one photograph and it’s depth map; then construct left and right images from these
The two methods we have discussed so far are based on capturing left and right eye images separately. Now we take a radically different approach to image capture.
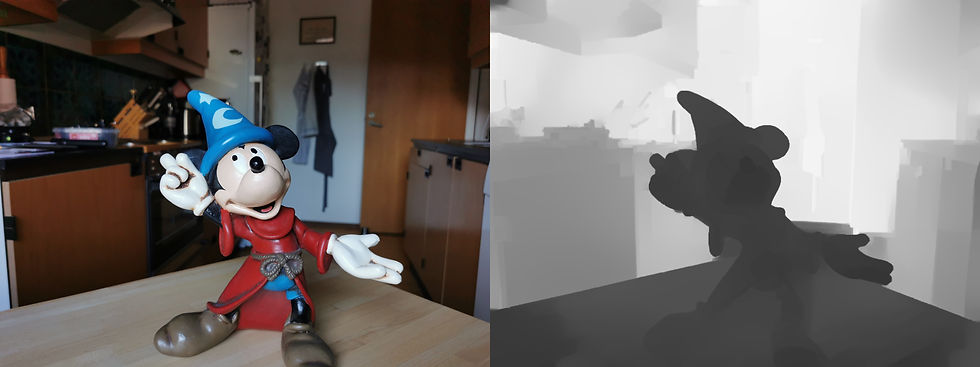
The method is based on simultaneous capture of a photograph and a so-called depth map of the scene. Files that contain both a normal photo and a depth map, the latter typically hidden are sometimes called 'depth photos'. As the example below illustrates, the grey scale value at any point in the depth map represents the distance to that particular point in the image (at least ideally).
Not all smartphones have the ability to capture depth maps, but since 2012 I have owned three phones that all did (Nexus 4/Huawei P9/Huawei P30 Pro), so no doubt lots of phones do. If you want to try it yourself, look for a camera mode on your phone that allows factors such as focus, depth of field, apparent aperture, and background blur or darkness to be modified after the image is recorded. On the Huawei P30 Pro the mode we need, since it retains the depth map in the saved file, is called Aperture. The Portrait mode on this phone makes use of the depth map as an intermediate step, but discards it when saving the file, and is therefore not useful for our purpose. Another indicator that you have found the right mode is that the file size is larger than the normal size (since the file contains both the photo and the hidden depth map).
If you want to try it yourself, look for a camera mode on your phone that allows factors such as focus, depth of field, apparent aperture and background blur or darkness to be modified after the image is recorded
How is a depth map going to help us see in 3D, you might ask? The principle is based on constructing a pair of simulated left and right images by shifting pixels in the original photo to the left or right by an amount that depends on the distance from the camera, as revealed by the depth map. Ideally we would want the native phone camera, or at least an app on the device to be able to make the conversion from depth image to stereo image, and hopefully that will be possible soon. In the meantime we can use Masuji Suto’s Stereophoto Maker software to do it, as described here. In this software you get to choose the grey value, and the corresponding distance for which you want the shift to be zero, and also the maximum deviation, which governs the magnitude of the depth effect.
Below we see the red-cyan anaglyph version of the Mickey scene, converted in Stereophoto Maker, with a chosen deviation of 3%:

and the corresponding left-right pair:

Guidance on how to view stereoscopic images may be found here, but if those do not work for you, this gif animation, created by DEPTHY may give an impression:

.. with the novel method it is possible to remap the depth space after capture, by modifying the grey scale of the depth map through application of curves, levels or gradient map adjustments...
Since our first example was of a close-up nature, the next example will have a bit more depth.
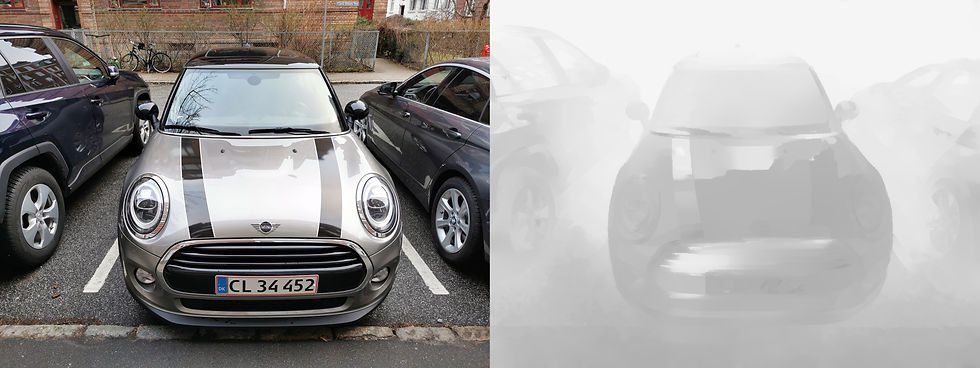
Here it is worth noting that the depth map generally features brighter tones than in our first example, in accordance with distances being longer. At first sight it may look as if there are significant errors in the depth map in the front of the car, with areas at the same distance from the camera having very different tones. But on closer inspection we see that the brightest parts here actually are reflections from the sky and surrounding buildings.
Below the resulting anaglyph, calculated with a deviation of 4.5% in Stereophoto Maker:

and the corresponding left-right pair

Based on these examples, we see that at least under some circumstances the depth map approach can produce rather nice results. This probably should not come as a surprise, since the principle is a well known pillar in the manual conversion of 2D photographs to 3D. Here, the professional doing the conversion will often meticulously paint a depth map by hand in e.g. Photoshop, and then use the displacement filter, or other software to create left and right eye views. So, while the principle is not new, what is relatively recent is that with a suitable smartphone we can now have the depth map created automatically at the time of capture.
Results will no doubt vary between phone brands and models. Also, one can expect that the method, like any other is not equally suited for all circumstances, subjects, and viewing conditions. All of that, however, seems to be rather unexamined at the moment. I intend to share more experiences in future posts, but also hope that others will feel inspired to explore and report on possibilities and limitations, as they see them.
In conclusion: Why does the depth map approach deserve attention from stereo photographers?
While the full range of pros and cons of the depth map approach remains to be explored, some preliminary indications can be given:
It is just as simple to record a stereo image as any other picture, once you have figured out which camera mode to use. Simpler than with the sequential method where you must take two photos, or the mirror method where you mount a physical attachment
Since it is based of simultaneous capture of all information needed, it handles moving subjects well
It handles close-up scenes very well, but it seems that the stereo effect does not extend quite as far as with some alternatives
The best stereo camera is the one that's with you
Some editing task are much easier, such as cloning, dodging and burning when you only need to modify one photo, rather than two (and therefore more likely to get done)
It is possible to remap the depth space after capture, by modifying the grey scale of the depth map through application of curves, levels or gradient map adjustments. This will be very interesting to explore
While Stereophoto Maker handles the conversion from depth image to stereo image very well, it would obviously be convenient if mobile phone camera software, or apps were able to do it.
Some helpful references
Ian Hellström: A Beginner's Guide to Stereoscopic Photography on a Smartphone 1-3 (links to part 2 and 3 at the end of part 1): https://databaseline.tech/a-beginners-guide-to-stereoscopic-photography-on-a-smartphone-part-1/
Jan Zimandl: Stereo Photo from Depth Photo: https://www.strv.com/blog/stereo-photo-from-depth-photo-engineering-ios
David Kuntz: Getting the right depth in 3D photography https://stereosite.com/taking-stereo-photos/getting-the-right-depth-in-3d-photography/
David Kuntz: Stereo Window Basics https://stereosite.com/taking-stereo-photos/stereo-window-basics/
Rebecca Sharpe: How to View Stereoscopic 3-D Images https://stereoscopy.blog/2019/08/04/how-to-view-stereoscopic-3-d-images-basic-tutorial/
Rebecca Sharpe : The Stereo Window Tutorial https://stereoscopy.blog/2020/06/14/the-stereo-window/
Gordon Au: Written and video tutorials on catadioptric stereos (mirror stereos) http://worldofdepth.com/tutorials.html
Triaxes: Manual depth map creation https://triaxes.com/articles/manual-depth-map-creation/
Jim McManus: 2D to 3D conversion, at NSA 3D-Con 2020: https://youtu.be/pexYcApLL-w?t=1923
Software
Masuji Suto’s Stereophoto Maker (Win software): http://stereo.jpn.org/eng/stphmkr/ . Probably the World’s most used stereo photo editor. Reads jpg files with embedded depth maps and convert them to stereo images. Frequently updated. General tutorial: https://stereoscopy.blog/2019/09/08/how-to-use-stereo-photo-maker-basic-tutorial/ Another general tutorial: https://www.wikihow.com/Make-3D-Images-Using-StereoPhoto-Maker Specialized tutorial for converting 'depth images' to stereo images: http://stereo.jpn.org/kitkat/indexe.html
Photopea.com – excellent free browser based general photo editor. Not specialized for 3D, but reads 'depth photos' into separate layers for the photo and the depth map when opening the file
DEPTHY - A free web resource that is able to read some photos containing embedded depth maps (but not all), and convert them to various formats: http://depthy.stamina.pl/
3DSteroid Pro – Android app for making sequential left-right type stereo images: https://play.google.com/store/apps/details?id=jp.suto.stereoroidpro&hl=en&gl=US Tutorial: https://stereoscopy.blog/2020/05/29/how-to-make-your-own-smartphone-stereoviews-basic-tutorial/
i3Dsteroid – iPhone app for making sequential left-right type stereo images: https://apps.apple.com/us/app/i3dsteroid/id467945370 Tutorial: https://stereoscopy.blog/2020/06/05/how-to-make-your-own-iphone-stereoviews-basic-tutorial/
Mirror attachments for simultaneous capture of left and right images
Loreo: loreo.com
Kula3D: kula3d.com

亚博体育 亚博体育 亚博体育 亚博体育 开云体育 开云体育 开云体育 开云体育 乐鱼体育 爱游戏体育 华体会体育 华体会体育
A great blog, it has a lot of useful information to me. Village Talkies a top quality professional <a href="https://www.villagetalkies.com/"> Corporate Video Production Company in Bangalore </a> and also <a href="https://www.villagetalkies.com/explainer-video/"> best explainer video company in Bangalore </a> & 3d, 2d <a href="https://www.villagetalkies.com/animation-video-makers/"> animation video makers in Bangalore </a>, Chennai, India & Maryland, Baltimore, provides Corporate & Brand films, Promotional, <a href="https://www.villagetalkies.com/marketing-videos/"> Marketing videos </a> & <a href="https://www.villagetalkies.com/training-videos/"> Training videos </a >, <a href="https://www.villagetalkies.com/product-service-demo-videos/"> Product demo videos </a> , Product video explainers, 2d, 3d Animation, Motion graphics, Whiteboard <a href="https://www.villagetalkies.com/employee-videos/"> Employee videos </a> and more for all start-ups, industries and corporate companies. From scripting to corporate, explainer & 3d,<a href="https://www.brandanimators.com/"> 2d animation video production </a>, our solutions are customized to y…